Connect and Control Options
Most of the time, the Pi doesn’t need an internet connection. There are, however, a couple of cases where you may want some sort of a network connection to the Pi.
These are:
- Downloading data from the Pi to a computer (requires a network connection but not internet)
- Initial setup with cloud-init (requires internet)
- Updating code by pulling from GitHub (requires internet)
There are three potential ways to communicate with the Raspberry Pi; direct control, ethernet, or via Wi-Fi. The Raspberry Pi as set up does not have a graphical user interface (GUI). After initial set-up, if the user wants to add remote access or move files onto the Pi, they wil need to do so using direct control. Direct control uses Secure Shell (ssh) protocol.
Direct Control
To access the Pi’s terminal directly you will need:
- Raspberry Pi 5
- Pi Power Supply (plugged into wall)
- Monitor (plugged into wall)
- HDMI to Micro-HDMI cable
- Keyboard
- Ethernet cable connected to a router (or ethernet port on the wall of the lab)
Connect the ethernet (or just use Wi-Fi), micro-HDMI, keyboard, and power supply to the Raspberry Pi. When
it boots, you will see the Pi’s Ubuntu Server terminal on the monitor and can log in and run commands
directly with the keyboard (no mouse inputs). There is no way to scroll up through this terminal, so if
you want to be able to read a long output from a command you must pipe it into a file (ex. python run.py >> terminal_output.txt), then read the text file using nano.
After you have connected to the Raspberry Pi using direct control, it is possible to configure the computer to use SSH so that you can log in to the Pi on your computer (via Ethernet or via Wi-Fi).
To do so, you need to set up SSH agent forwarding, or confirm that it is already running.
Confirm that SSH agent forwarding (i.e. a remote server can access the local SSH agent on your behalf)
is working properly by running ssh -T git@github.com.
SSH Agent Forwarding
If you need to authenticate to GitHub to download code, the recommended way is using SSH agent forwarding.
To summarize the above link, you should make sure you have an SSH key setup with your GitHub account.
Test this by running ssh -T git@github.com.
Setup an SSH Key
If you do not already have an SSH key, you can create one as follows:
- In your terminal (PowerShell on Windows) run
ssh-keygen -t ed25519 -C “your@email.com”and accept the default location. - Create a memorable password. When you type the password, no text will appear in the terminal but the password is being logged.
- We now need to copy the public key you just created. When the key was generated, a message should have been printed that says something like Your public key has been saved in
/home/<username>/.ssh/id_ed25519.pub. - To view the contents of this public key file, run
cat <path-from-above>/.ssh/id_ed25519.puband copy the full key that is printed to the terminal.
You then need to add this SSH to the Pi. The simplest method is to first add the key to your GitHub account, then import it onto the Pi from there. If you don’t want to set up GitHub, you can add the key directly with a little extra work.
GitHub:
- Create an account on GitHub and sign in.
- In GitHub, open settings and go to the SSH and GPG keys tab and add a new SSH key.
- Name this key whatever you want and paste the key into the correct field.
- Log into the Pi using the direct control method above.
- Run
ssh-import-id gh:<your-github-username>.
Without GitHub:
- Log into the Pi using the direct control method above.
- Open the authorized keys file with
sudo nano ~/.ssh/authorized_keys. - Manually copy your key (starts with ssh-ed25519, ends with a comment) into the file
- Hit Ctrl+X followed by Y, then Enter to save the changes.
You should now have permission to SSH into the Pi from your laptop using direct control, ethernet, or Wi-Fi.
Modify your ~/.ssh/config file (use nano ~/.ssh/config) and add an entry like this enabling
SSH agent forwarding:
Host 192.168.11.137
    HostName 192.168.11.137
    User ubuntu
    ForwardAgent yes
Note that if your username or host IP address is different, you should adjust it accordingly.
Remote host identification has changed
If you use the same static IP for multiple Pi’s (which, presumably, you only ever use one of at a time), you may encounter an error stating:
@@@@@@@@@@@@@@@@@@@@@@@@@@@@@@@@@@@@@@@@@@@@@@@@@@@@@@@@@@@
@    WARNING: REMOTE HOST IDENTIFICATION HAS CHANGED!     @
@@@@@@@@@@@@@@@@@@@@@@@@@@@@@@@@@@@@@@@@@@@@@@@@@@@@@@@@@@@
IT IS POSSIBLE THAT SOMEONE IS DOING SOMETHING NASTY!
Someone could be eavesdropping on you right now (man-in-the-middle attack)!
It is also possible that a host key has just been changed.
This is because your computer thinks its connecting to a different Raspberry Pi.
You can manually add the fingerprint for the currently connected Pi like this:
ssh-keyscan -H 192.168.11.137 >> ~/.ssh/known_hosts
(This would be a bad idea to do at random for a remote computer. I’m assuming here that you’ve just plugged in a new Pi right in front of you and you know exactly why you’re getting this error. You should only have to do this once per new Pi.)
Once this is set up properly, it is possible to connect to the Raspberry Pi through your computer (Ethernet) or through Wi-Fi, so long as the Raspberry Pi remains powered.
SSH over Ethernet
This is the preferred method for connecting to and controlling the Pi, and the only method that does not require the Pi to be connected to a router or Wi-Fi network. However, it does take a bit of setup the first time.
For this method, you will need:
- Laptop connected to Wi-Fi
- Raspberry Pi 5
- Pi Power Supply (plugged into wall)
- Ethernet cable
- Ethernet to usb-c adapter (if your laptop doesn’t have an ethernet port)
Configuring your computer
If you’re connecting to the Pi via a simple ethernet cable to your computer,
you’ll want both configured with static IPs. The config file above will do this
on the Pi side. On your computer, you’ll want to set a static IP of 192.168.11.1
and a netmask of 255.255.255.0. For example, your settings may look like this:
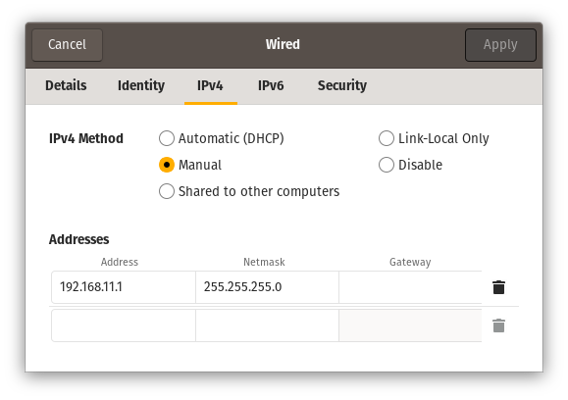
Example laptop configuration to connect to the Pi over an ethernet cable
Sharing internet from your computer
Common Mac Problem
Keep in mind that, especially if you are on a network with a firewall and you are using a more recent MacBook, due to how Mac routes Wi-Fi, the Raspberry Pi’s internet connection will either be difficult or impossible. SSH via Ethernet is most likely to work on a Windows or Linux machines. If you are using a Mac on university Wi-Fi, and can ping the Raspberry Pi but the Pi cannot connect to the network, you will likely need to either use a different network on your computer, contact your university’s IT department, or use a different Control Type.Do you need to do this?
This process is a little annoying to setup. If you can easily connect your Pi to a separate Wi-Fi network with internet access, you probably don’t need to do this.
If your Wi-Fi network requires complicated configuration to join, requires a key or password you don’t want to leave around on the Pi, or only allows some devices to join, this is an alternative approach that only requires a separate computer (i.e. your laptop) to have internet access.
Sharing your computer’s internet connection from one network interface to another is a useful trick to get an internet connection for the Pi. This can be done between any two network interfaces (i.e. from your Wi-Fi connection to the Pi over ethernet or from one WiFi card to a network created by a second Wi-Fi card).
The Arch Linux wiki has useful instructions for configuring internet sharing on Linux.
To briefly summarize them:
All of this setup will happen on your laptop (or whatever computer has an internet connection).
- Enable IPv4 forwarding:
sudo sysctl net.ipv4.ip_forward=1 - Setup NAT with iptables: (See note below if you have docker installed!)
sudo iptables -t nat -A POSTROUTING -o wlan0 -j MASQUERADE
sudo iptables -A FORWARD -m conntrack --ctstate RELATED,ESTABLISHED -j ACCEPT
sudo iptables -A FORWARD -i net0 -o wlan0 -j ACCEPT
Where wlan0 should be replaced with the name of the network interface on
your computer which is currently connected to the internet, and net0 should
be replaced with the name of the network interface on the same computer which is
connected to the Pi.
Note for Docker users
If you have docker installed on your system, it changes your default firewall settings . As a result, you need to setup NAT slightly differently:
sudo iptables -t nat -A POSTROUTING -o wlan0 -j MASQUERADE
sudo iptables -I DOCKER-USER 1 -m conntrack --ctstate RELATED,ESTABLISHED -j ACCEPT
sudo iptables -I DOCKER-USER 2 -i net0 -o wlan0 -j ACCEPT
Connecting to Wi-Fi through Ethernet
Process
Plug the power supply into the Pi and plug one end of the ethernet cable into the Pi, and the other into your laptop.
Connect your laptop to any Wi-Fi network.
If your laptop’s public SSH key is not already on the Pi, see the section above for how to add it.
If this is your first time setting up this method, you will now need to enable internet sharing on your laptop. If you have done this before, then skip this step.
Windows:
- Open Control Panel and go to the Network section.
- Find the Wi-Fi connection and right click on it, then go to Properties.
- At the top, click on the Sharing tab.
- Check “Allow other network users to connect…”
- In the dropdown, select “Ethernet2” (not the ethernet for WSL).
- Apply the changes.
Linux:
- Install Network Manager Command-line Interface (nmcli) with
sudo apt install network-manager. - Find the connection name with
nmcli con show. Find the entry with type ethernet, it should have a name like “Wired connection 1”. - Run
nmcli con modify “Wired connection 1” ipv4.method shared.
If you are on Linux, run
nmcli con up “Wired connection 1”Find the Pi’s IP address on your local subnet.
- Windows: Open PowerShell and run
arp -a. You should see an interface for 192.168.137.1 and within that section should be an IP address that starts with 192.168.137 and ends with something other than .0 or .1 (ex. 192.168.137.27). - Linux: If for some reason you cannot find the IP, confirm the subnet is 10.42.0 by running
ip a. Look at the section labeledenxcand make sure it says “state UP”. You should see labeled something likeinet 10.42.0.1/24. You can then scan the subnet to find the pi by runningnmap -sn 10.42.0.1/24and looking for a device that’s not 10.42.0.1. You may need to restart the Pi and give it a minute to boot.
- Windows: Open PowerShell and run
Run
ssh ubuntu@<pi-ip-address>to connect to the Pi. You can now run commands on the Pi, and transfer files to and from your laptop using SCP (see below).
SSH over Wi-Fi
This method is nice as it requires less cables and can be used for connecting multiple devices, however you will have to use one of the other methods such as SSH over Ethernet initially to find the Pi’s internet IP address.
For this method, you will need:
- Laptop connected to Wi-Fi
- Raspberry Pi 5
- Pi Power Supply (plugged into wall)
- Ethernet cable connected to a router (or to the ethernet port on the wall of the lab) if not connecting the Pi to Wi-Fi
Process
- Plug the ethernet and power cable into the Pi and turn it on.
- If you do not know what the Pi’s current IP address is, you must first use the Direct Control method above to get access to the terminal. When the Pi first boots, system information is printed to the terminal. In the bottom right corner of this message, you should see a section that says “IPv4 address for eth0: 128.138.189.xxx”. You can also find the IP address by running
ip aand looking for the address under the eth0 section. This address may change each time the Pi is reconnected to the internet. - Connect your laptop to the UCB Wireless network.
- Check if you can find the Pi over the internet by running the command
ping -c 1 128.138.189.xxx(where xxx is replaced by the Pi’s IP). On Windows, this must be done in PowerShell, not WSL. If it says 0 packets received, then either the IP address is incorrect, or you are not on the same network as the Pi. - If your laptop’s public SSH key is not already on the Pi, see the section above for how to add it.
- Run
ssh ubuntu@128.138.189.xxxto connect to the Pi. You can now run commands on the Pi, and transfer files to and from your laptop using SCP (see above).
Transferring files to and from the Pi
The Raspberry Pi 5 unfortunately does not support data transfer (USB OTG) over its USB 3.0 ports. Fortunately, we can make use of the SSH connection to send files to and from the Pi using SCP and/or GitHub.
If you have committed changes to the code and pushed them to GitHub, you can just checkout the correct branch and run git pull on the Pi to see them. However, if you are debugging or making small changes to a file that aren’t worthy of a commit, you can send files directly with SCP by running the following command on your laptop.
Send a single file with scp <my-file-path> ubuntu@<pi-ip-address>:<pi-directory-path>.
- Windows:
scp sdr/main.cpp ubuntu@192.168.137.10:~/uhd_radar/sdr/ - Linux:
scp sdr/main.cpp ubuntu@10.42.0.10:~/uhd_radar/sdr/
You can also send a whole folder with scp -r <my-directory-path> ubuntu@<pi-ip-address>:<pi-directory-path>.
To send files from the Pi back to your laptop, reverse the two arguments ensuring the first is one or more files, or directory, and the second is a directory for where the file should go.
ex. scp ubuntu@10.42.0.10:~/uhd_radar/data/20250716* ~/uhd_radar/data/.