Network Config
Giving your Pi information to connect to the network
In order to standardize between units, much of the Pi setup is automated or semi-automated. This guide will walk you through the steps of setting up your Pi the way we do. Along the way, there are also links for more information on how to customize this setup. This is an area where you will almost certainly need to customize some aspects of the setup.
To start, download the Raspberry Pi Imager tool (or use your preferred software for imaging SD cards). Imaging is basically giving the Raspberry Pi an operating system. On Ubuntu, you can install it like this:
sudo apt install rpi-imager
For other operating systems, download the tool from here.
Ubuntu Server 24.04.xx LTS (64-bit). Make sure you get 64-bit, 32-bit will not work. Also make sure that the Raspberry Pi you are using is supported.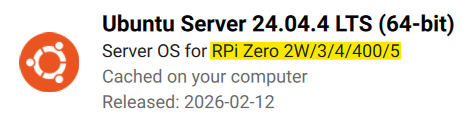
You want Ubuntu Server 24.04 LTS 64-bit and make sure your Pi is supported as shown in the highlight
After imaging is complete, you should see a system-boot drive and maybe a writable drive. system-boot is more important.
system-boot drive, it is likely because it wasn’t assigned a letter. You need admin privliages to fix this. Hit WIN + X and select “Disk Manager”. You will see the system-boot drive there, it just doesn’t have a letter. Right click on it and assign a letter. Click “add” on the pop up and assign it a letter. The drive should now be visible in your file explorer.Setup of the Raspberry Pi is semi-automated using cloud-init.
The cloud-init setup is controlled by two files: user-data and network-config.
(You’ll use these files a couple of steps down.)
Examples of each are shown below, but you will likely need to modify these to suit your purpose. We have pages on how to customize network-config and user-data. If you are trying to connect to an enterprise Wi-Fi like a university’s guest wifi, maybe you need to contact OIT to get your device whitelisted. This is how it is at CU Boulder, and I have no idea about how other university’s Wi-Fis work.
#cloud-config

# This is the user-data configuration file for cloud-init.
# The cloud-init documentation has more details:
#
# https://cloudinit.readthedocs.io/

system_info:
  default_user:
    name: ubuntu # Allow the default user to shutdown or reboot the system without entering a password (used by our automated scripts)
    sudo: "ALL=(ALL) NOPASSWD: /sbin/poweroff, /sbin/reboot, /sbin/shutdown"

# On first boot, set the (default) ubuntu user's password to "cryosphere"
chpasswd:
  expire: false
  users:
    - name: ubuntu
      password: $6$rounds=4096$aQ7tu0.beL3WAL32$fKxKYvZpY7EMCoxAU1heRomA3v8WvgbqBhhz08QwOtQdlP/DJOP2BThqZFoRW8d2a9PaIKK9BC9NHs1qNnkya1
      type: hash

# Enable password authentication with the SSH daemon
ssh_pwauth: true

# Set a default timezone
timezone: Etc/UTC

## Update apt database and upgrade packages on first boot
package_update: true
package_upgrade: true

## Install additional packages on first boot
packages:
- net-tools
- git
- cmake
- g++
- mosh
- exfat-fuse
- i2c-tools
- rpi.gpio-common
- util-linux-extra
- gpsd
- gpsd-clients

## Write arbitrary files to the file-system
write_files:
- path: /home/ubuntu/initial_setup.sh
  content: |
    #!/bin/bash
    exec > >(tee -a "initial_setup_output.log") 2>&1
    # Miniconda Setup
    wget --progress=bar:force:noscroll "https://github.com/conda-forge/miniforge/releases/latest/download/Miniforge3-Linux-aarch64.sh" -O $HOME/miniconda.sh
    bash $HOME/miniconda.sh -b -p $HOME/miniconda
    cd $HOME
    source .profile
    source miniconda/etc/profile.d/conda.sh
    conda init bash
    # Setup logger environment
    git clone git@github.com:thomasteisberg/uav_radar_logger.git
    # Clone uhd_radar repo
    git clone git@github.com:radioglaciology/uhd_radar.git
    cd uhd_radar
    #git checkout thomas/dask # Uncomment if you want to check out a specific branch other than main
    conda env create -n uhd -f environment-rpi.yaml
    conda activate uhd
    python /home/ubuntu/miniconda/envs/uhd/lib/uhd/utils/uhd_images_downloader.py
    systemctl --user enable radar.service
    systemctl --user enable logger.service
    ifconfig
    sudo reboot
  append: true
- path: /home/ubuntu/.profile
  content: |
    PATH=/home/ubuntu/miniconda/bin:$PATH
    source /home/ubuntu/.bashrc
  append: true
- path: /home/ubuntu/.ssh/known_hosts
  content: |
    github.com ssh-ed25519 AAAAC3NzaC1lZDI1NTE5AAAAIOMqqnkVzrm0SdG6UOoqKLsabgH5C9okWi0dh2l9GKJl
    github.com ecdsa-sha2-nistp256 AAAAE2VjZHNhLXNoYTItbmlzdHAyNTYAAAAIbmlzdHAyNTYAAABBBEmKSENjQEezOmxkZMy7opKgwFB9nkt5YRrYMjNuG5N87uRgg6CLrbo5wAdT/y6v0mKV0U2w0WZ2YB/++Tpockg=
    github.com ssh-rsa AAAAB3NzaC1yc2EAAAADAQABAAABgQCj7ndNxQowgcQnjshcLrqPEiiphnt+VTTvDP6mHBL9j1aNUkY4Ue1gvwnGLVlOhGeYrnZaMgRK6+PKCUXaDbC7qtbW8gIkhL7aGCsOr/C56SJMy/BCZfxd1nWzAOxSDPgVsmerOBYfNqltV9/hWCqBywINIR+5dIg6JTJ72pcEpEjcYgXkE2YEFXV1JHnsKgbLWNlhScqb2UmyRkQyytRLtL+38TGxkxCflmO+5Z8CSSNY7GidjMIZ7Q4zMjA2n1nGrlTDkzwDCsw+wqFPGQA179cnfGWOWRVruj16z6XyvxvjJwbz0wQZ75XK5tKSb7FNyeIEs4TT4jk+S4dhPeAUC5y+bDYirYgM4GC7uEnztnZyaVWQ7B381AK4Qdrwt51ZqExKbQpTUNn+EjqoTwvqNj4kqx5QUCI0ThS/YkOxJCXmPUWZbhjpCg56i+2aB6CmK2JGhn57K5mj0MNdBXA4/WnwH6XoPWJzK5Nyu2zB3nAZp+S5hpQs+p1vN1/wsjk=
- path: /etc/security/limits.conf # Recommended by Ettus https://kb.ettus.com/USRP_Host_Performance_Tuning_Tips_and_Tricks
  content: |
    ubuntu    - rtprio    99
  append: true
- path: /etc/systemd/user/radar.service
  content: |
    [Unit]
    Description=Service to run the radar code on startup

    [Service]
    Type=simple
    WorkingDirectory=/home/ubuntu/uhd_radar/
    ExecStart=/home/ubuntu/uhd_radar/manager/radar_service.sh

    Restart=always
    RestartSec=10

    KillSignal=SIGINT

    [Install]
    WantedBy=default.target
- path: /etc/systemd/user/logger.service
  content: |
    [Unit]
    Description=Service to log data from I2C sensors and automatically shutdown below a voltage threshold

    [Service]
    Type=simple
    WorkingDirectory=/home/ubuntu/uav_radar_logger/
    ExecStart=/home/ubuntu/uav_radar_logger/logger_service.sh

    Restart=always
    RestartSec=60

    KillSignal=SIGINT

    [Install]
    WantedBy=default.target

# Run arbitrary commands at rc.local like time
# These commands are run with root permissions
# If you want commands run as a normal user, put them in initial_setup.sh (see above)
# which is run as the "ubuntu" user (see below)
runcmd:
- chown -R ubuntu:ubuntu /home/ubuntu
- chmod +x /home/ubuntu/initial_setup.sh
- wget -O /etc/udev/rules.d/uhd-usrp.rules https://raw.githubusercontent.com/EttusResearch/uhd/master/host/utils/uhd-usrp.rules
- usermod -a -G i2c ubuntu
- usermod -a -G dialout ubuntu
- usermod -a -G tty ubuntu
- apt remove -y modemmanager
- systemctl stop serial-getty@ttyS0.service && systemctl disable serial-getty@ttyS0.service
- i2cdetect -y 1
- echo "dtoverlay=i2c-rtc,pcf8523" >> /boot/firmware/config.txt
- loginctl enable-linger ubuntu
- mkdir /media/ssd
- chown ubuntu /media/ssd
- chgrp ubuntu /media/ssd
- echo "/dev/sda2  /media/ssd  exfat  defaults,nofail,uid=1000,gid=1000  0  2" | tee -a /etc/fstab
# This file contains a netplan-compatible configuration which cloud-init will
# apply on first-boot (note: it will *not* update the config after the first
# boot). Please refer to the cloud-init documentation and the netplan reference
# for full details:
#
# https://cloudinit.readthedocs.io/en/latest/topics/network-config.html
# https://cloudinit.readthedocs.io/en/latest/topics/network-config-format-v2.html
# https://netplan.io/reference

version: 2
ethernets:
  eth0:  # Your ethernet name.
    dhcp4: no
    addresses: [192.168.11.137/24]
    gateway4: 192.168.11.1
    nameservers:
      addresses: [8.8.8.8,8.8.4.4]
wifis:
  renderer: networkd
  wlan0:
    dhcp4: true
    optional: true
    access-points:
      "<YOUR WIFI SSID HERE>":
        password: "<YOUR WIFI PASSWORD HERE>"
# This file contains a netplan-compatible configuration which cloud-init will
# apply on first-boot (note: it will *not* update the config after the first
# boot). Please refer to the cloud-init documentation and the netplan reference
# for full details:
#
# https://cloudinit.readthedocs.io/en/latest/topics/network-config.html
# https://cloudinit.readthedocs.io/en/latest/topics/network-config-format-v2.html
# https://netplan.io/reference

network:
  version: 2
  renderer: networkd
  wifis:
    wlan0:
      dhcp4: yes
      access-points:
        "<WIFI SSID HERE>":
          password: "<PASSWORD HERE>"
After you edit the user-data and network-config files and add them to your SD card. You can now put the card back into the Pi.
Next, read on how to power on and connect to the pi.
Giving your Pi information to connect to the network
Understanding the user-data file and any edits you may want to make